Dockerizing ASP.NET Core Web API
Contents
Background
So I have an existing ASP.NET Core API that I want to host on Heroku. Since Heroku doesn't natively support .NET apps, we have to put all services of our app in Docker containers which are supported.
Introduction
The task is to dockerize my API together with an instance of SQL Server for my database.
Since it's best practice to have only one app/service/thing per container,
the API and database will have to live in separate containers and somehow talk to each other.
We will achieve this using Docker Compose which is used to connect multiple containers.
So the tasks are:
- Dockerize the .NET Core API
- Dockerize an instance of SQL Server
- Connect the two using Docker Compose
This post will cover the first task:
Part 1: Dockerizing the .NET Core API
Setup
So here's my current project. It was built on ASP.NET Core 2.2.
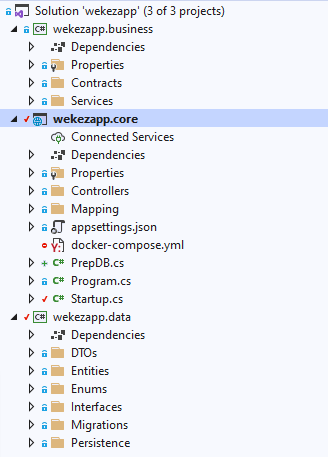
This is a typical ASP.NET API that contains three projects.
wekezapp.core is the startup project and is the main project.
It houses my controllers and exposes my API endpoints.
wekezapp.business is my services layer.
It contains all the business and data processing logic.
wekezapp.data is my data layer.
It contains my context class and models. Its sole task is to perform data access to the db.
I'm running Docker on Windows and set to Linux containers.
This means that all the apps I containerize in my Docker environment will be running on Linux.
And this is purely out of preference.
This isn't a problem for my .NET Core API because .NET Core is supported on Linux.
Note: You can use Docker Compose to connect a Linux and Windows container. (https://devblogs.microsoft.com/premier-developer/mixing-windows-and-linux-containers-with-docker-compose/)
The Dockerfile
The first step to dockerizing an app is to create the Dockerfile.
A Dockerfile is a file named Dockerfile with no file extension.
What's the purpose of a Dockerfile?
- It lets you specify the base Docker image you'll need to containerize your application
- It lets you copy all the source files you need from the host into the container
- And finally it allows you to issue a command in the container's shell to stat your application
Anatomy of the docker file
-
Define a base image
FROM mcr.microsoft.com/dotnet/core/sdk:2.2 AS build-envThe base image is a Docker image that we will base our container on. This is an official SDK image by Microsoft that contains dev tools for .NET Core 2.2. It will allow us to build our application inside the container.
Note that we are providing an alias for the image using theAScommand,
so nowbuild-envwill refer to this image. -
Copy project files and restore packages
COPY . ./
RUN dotnet restore "./wekezapp.core/wekezapp.core.csproj"
RUN dotnet restore "./wekezapp.data/wekezapp.data.csproj"
RUN dotnet restore "./wekezapp.business/wekezapp.business.csproj"
This tells Docker to copy all the project files into the container, and the
RUNcommand allows us to run commands in the container shell, such asdotnet, which we will use to build our API.
We then restore all required NuGet packages. -
Publish the project
RUN dotnet publish -c Release -o publishAfter restoring NuGet packages, we can go ahead and publish our project. This will build and publish our API in the output folder
publish. -
Build the runtime image
FROM mcr.microsoft.com/dotnet/core/aspnet:2.2.3
WORKDIR /app/wekezapp.core
COPY --from=build-env /app/wekezapp.core/publish .
Here, we're changing the base image to another official image by Microsoft, the ASP.NET Core 2.2.3 runtime image. This will provide a runtime envirionment for our API to run in. So we copy all the files from the previous image into the new runtime image.
-
Start the application
ENTRYPOINT ["dotnet", "wekezapp.core.dll"]This basically tells Docker how to start out application, by running
dotnet wekezapp.core.dllin the container.
And that's it! The full Dockerfile looks like this:
FROM mcr.microsoft.com/dotnet/core/sdk:2.2 AS build-env
WORKDIR /app

# Copy everything and restore nuget packages
COPY . ./
RUN dotnet restore "./wekezapp.core/wekezapp.core.csproj"
RUN dotnet restore "./wekezapp.data/wekezapp.data.csproj"
RUN dotnet restore "./wekezapp.business/wekezapp.business.csproj"

# Copy publish the project
RUN dotnet publish -c Release -o publish

# Build runtime image
FROM mcr.microsoft.com/dotnet/core/aspnet:2.2.3
WORKDIR /app/wekezapp.core
COPY --from=build-env /app/wekezapp.core/publish .
ENTRYPOINT ["dotnet", "wekezapp.core.dll"]
Build the Docker image
The next step is creating a Docker image.
A docker image is like a blueprint that's used to create the actual container.
You create one using the docker build command.
docker build -t wekezapp-image -f Dockerfile .When we run that, this is what we get:
We can see it restoring nuget packages for our projects in the image.
Next, we use our newly-created image to create the container:
Creating the Docker container
docker run -it --rm -p 5000:80 --name wekezapp-container wekezapp-image- -it flag tells docker to take you straight into the container. So the command line you are on will now be directly connected to the container's shell, in this case /bin/bash since it's a Linux container.
- --rm means to delete the container once the command finishes executing. This isn't bad, as docker containers are generally wanted to be stateless
- -p 5000:80 tells it to map port 5000 on our local machine to port 80 on the container
-
wekezapp-containeris what we want to name the container and finally.. -
wekezapp-imageis the image we want to use to create the container.
Running this command results in
Now listening on: http://[::]:80localhost:5000.
5000 is the local port we mapped to port 80 in the container in our docker build command.
And I can now try to access an API endpoint like localhost:5000/api/users
which is supposed to return a list of users from the db and I get:
An error occurred using the connection to database 'Wekezapp' on server '.'.
This error makes sense because the API is the only thing in the container.
It's trying to access the db on the local machine and of course, there is none.
So in the next part, I will containerize my db.